
This Homemade Piñata Cake is Totally Instagram Worthy
This piñata cake tastes like it’s from a bakery!
Ready to surprise all your guests at your next celebration?
If you’re like me, you’ve fallen in love with all of the amazing candy-filled piñata cakes on Pinterest and Instagram. But if you buy these cakes from a bakery, they are VERY pricey, so I thought I’d share this yummy dessert recipe to help you save some money while treating your family.
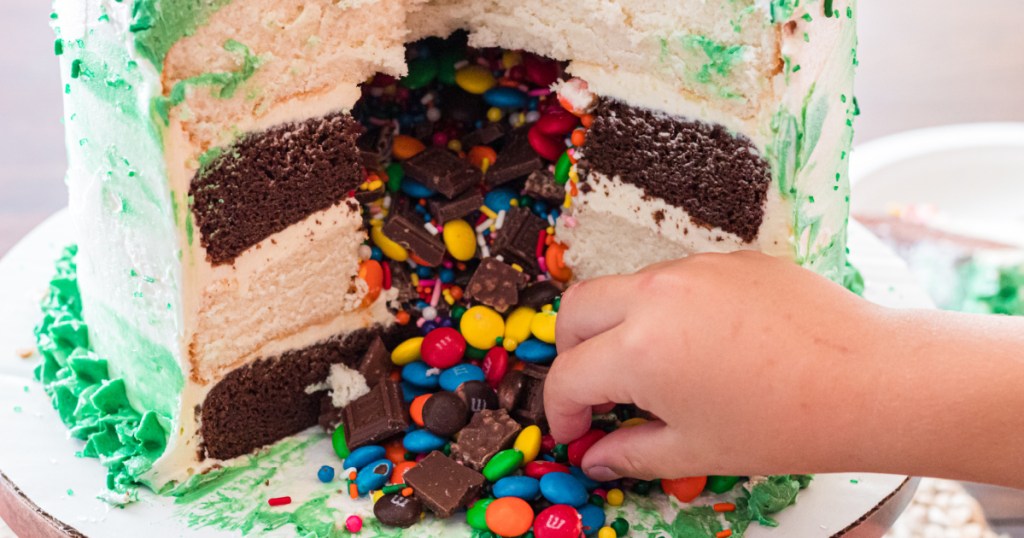
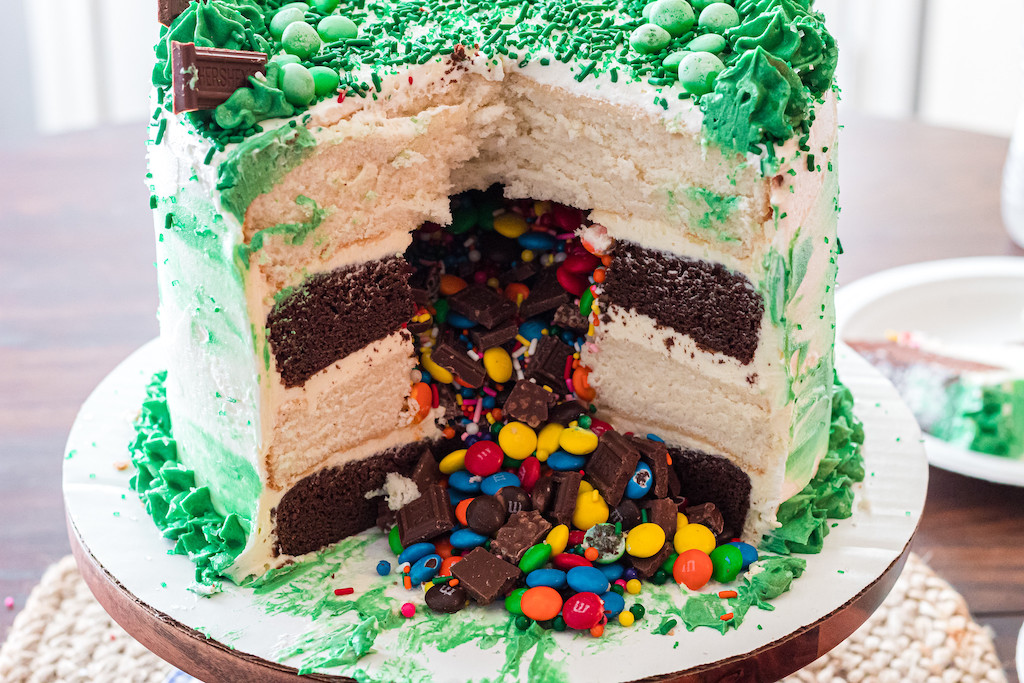
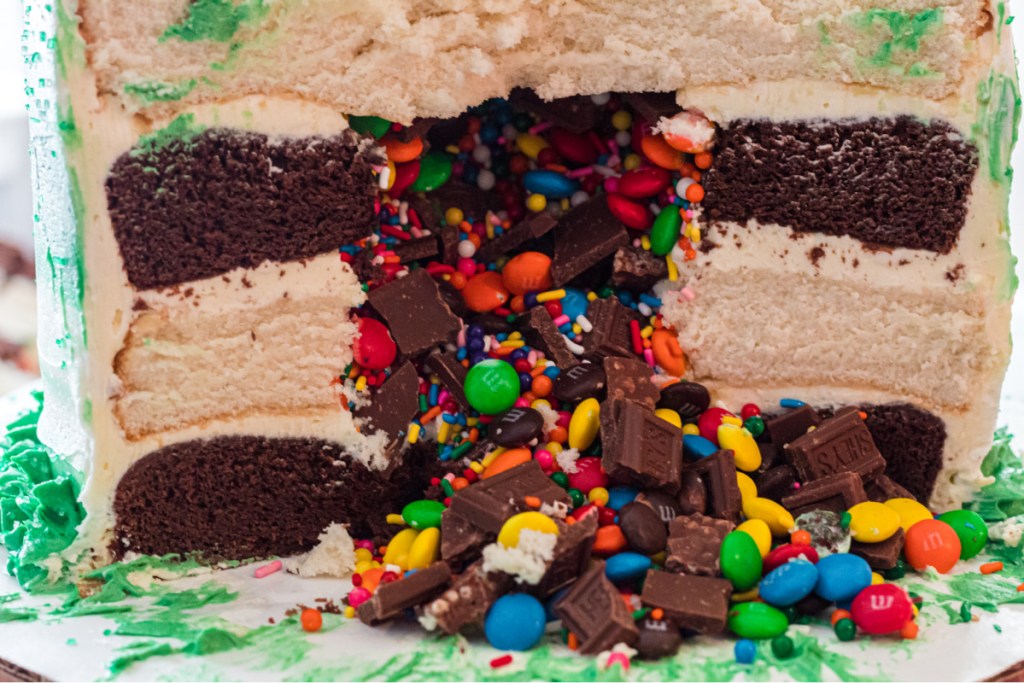
It might look like a normal cake from the outside but wait until you cut a slice out. Everyone will think you shelled out big money at a high-end bakery for the candy surprise inside, so go ahead and give yourself a pat on the back.
More on that surprise inside!
This cake is filled with a candy surprise… but it really is more of a surprise on how simple it is to make. I have broken down step-by-step on how to make your very own piñata candy cake. Be warned, everyone will be asking you to make one for them after they see how amazing it looks (and tastes)!
While this cake may appear to be overwhelming to make at first glance, it truly is much easier than it looks!
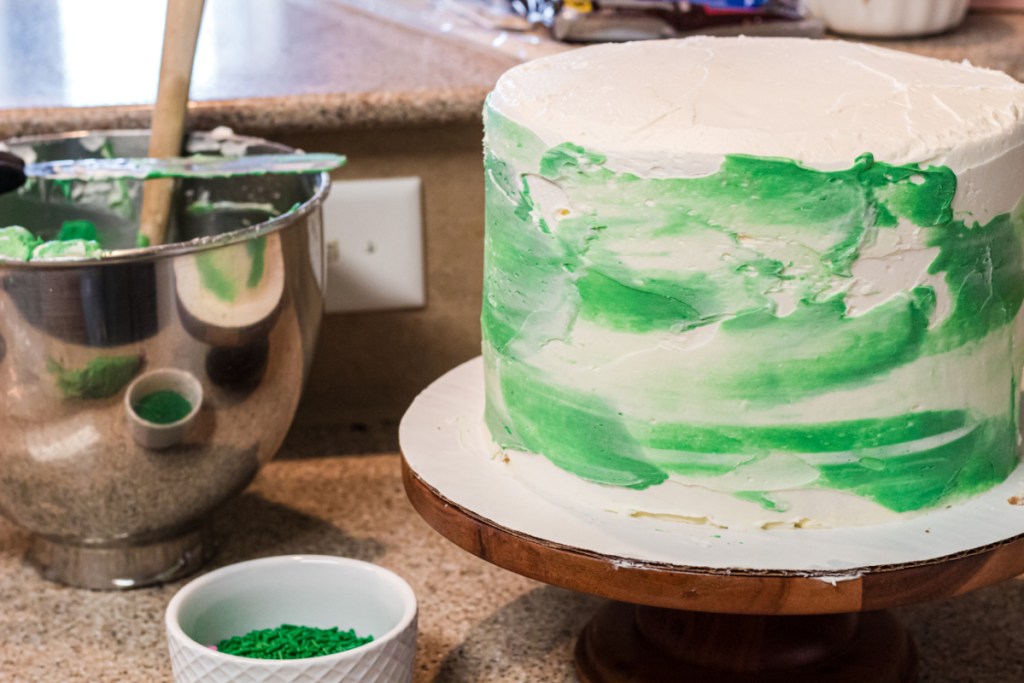
Tips for making the best Piñata Cake:
- I love baking my cakes the night before to make for simple assembly the next day. Just wrap the cakes in saran wrap, pop them in the fridge, and unwrap when ready to create your piñata cake!
- If you’re running short on time, then feel free to use store-bought frosting. But I will say that our delicious homemade buttercream frosting recipe is actually a cinch to make and can be whipped up a day ahead of time as well. I tripled it for this piñata cake.
- This cake is perfect for any and all occasions! You can use your favorite candies or seasonal varieties to fit the theme of a party.


Piñata Candy-Filled Cake
yield: 10 SERVINGS
prep time: 30 MINUTES
cook time: 20 MINUTES
total time: 50 MINUTES
A delicious candy filled pinata cake that is homemade, but tastes like it's from a bakery.
Ingredients
Bakery-Style Cake From Boxed Cake Mix:
- 2 boxes of cake mix, any brand and flavor
- 10 eggs, divided
- 1 1/3 cup melted butter, divided
- 2 cups of milk, divided
Extras for the Piñata Cake:
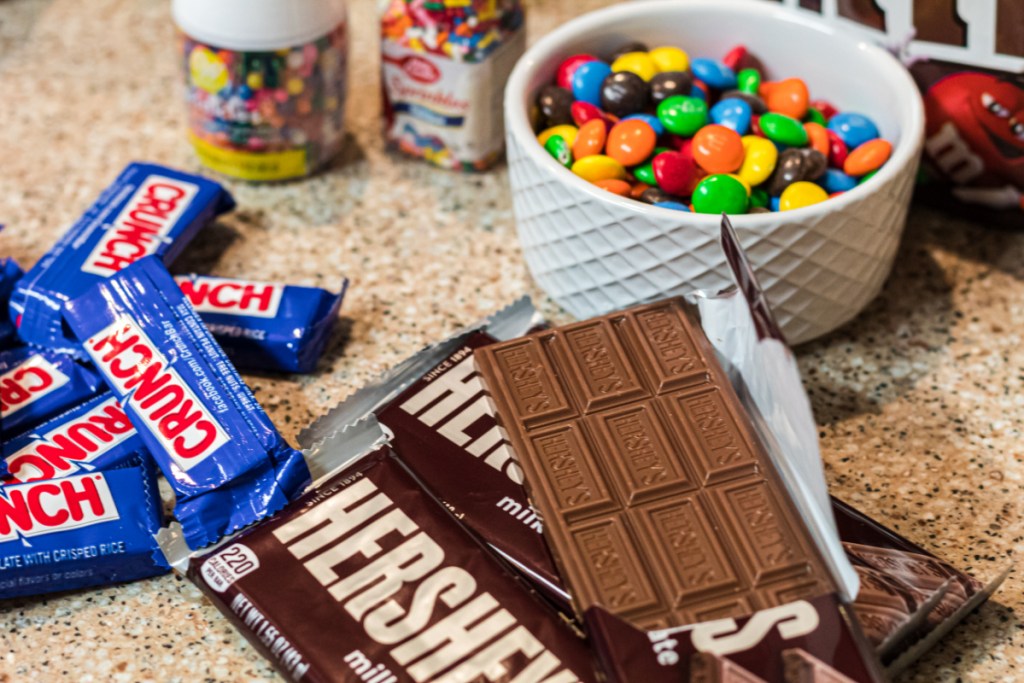
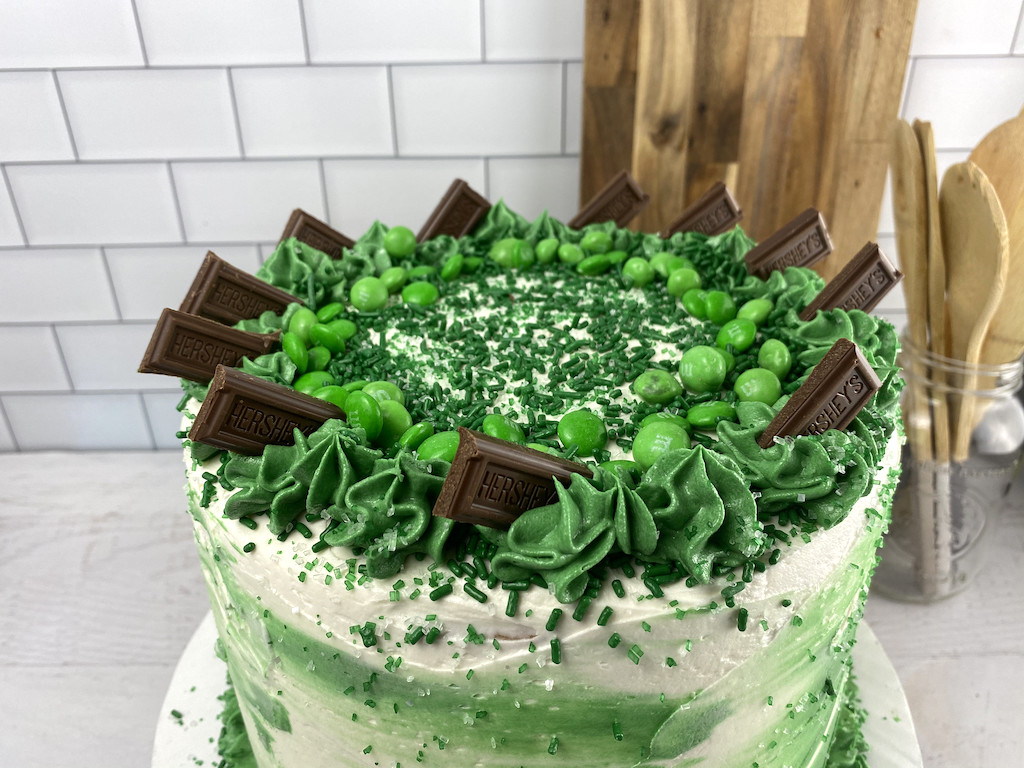
- Your favorite candy or sprinkles — I used M&M's, Crunch bars, Hershey bars, and rainbow sprinkles
- 4- 6" cake dowels rods (or skewers)
- Buttercream frosting
Directions
1
To bake the cakes:
Preheat oven to 350 degrees. Grease four 8" round cake pans. You could also bake in batches and bake only 2 pans at a time.
2
In a large mixing bowl, combine one box of cake mix, 5 eggs, 2/3 cup melted butter, and 1 cup of milk using an electric mixer at medium speed for 2 minutes. You could also use a stand mixer if preferred.
Note that you will do this process for both boxes of cake mixes separately if using 2 different flavors. If using the same cake mix flavor, you can combine all at once if you have a large enough mixing bowl for double the batter.
3
Pour the batter evenly between four 8" round cake pans and spread out. Again, you could also bake just two pans at a time.
4
Bake for 25-30 minutes, or according to box directions. The cake is done when a toothpick inserted in the center comes out clean.
5
Let cake cool completely before transferring it to the cooling racks.
6
To prepare the layers:
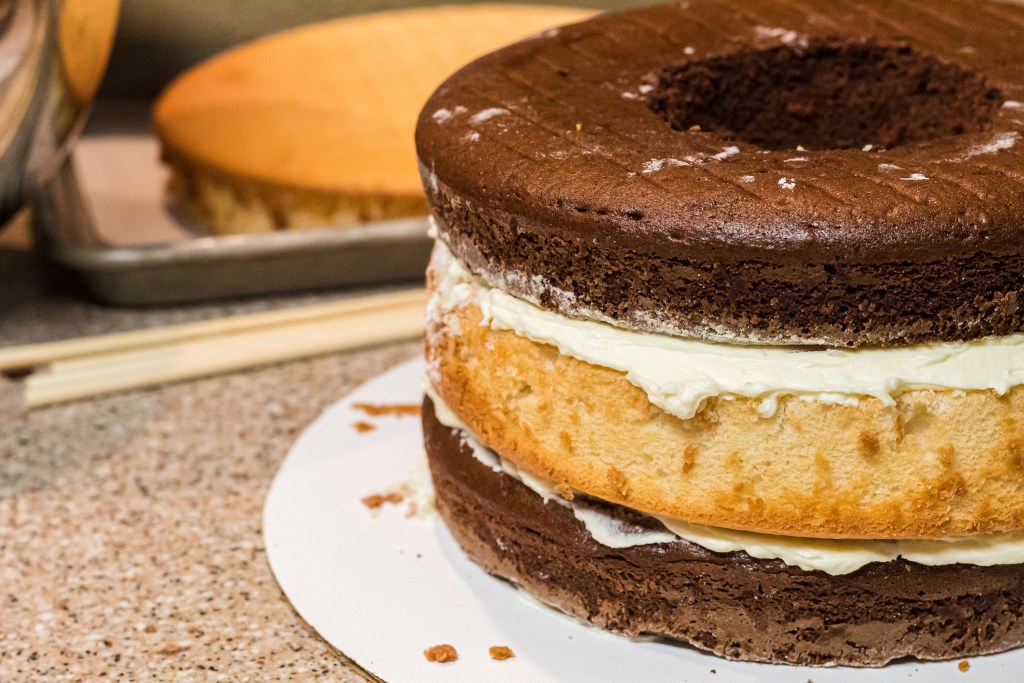
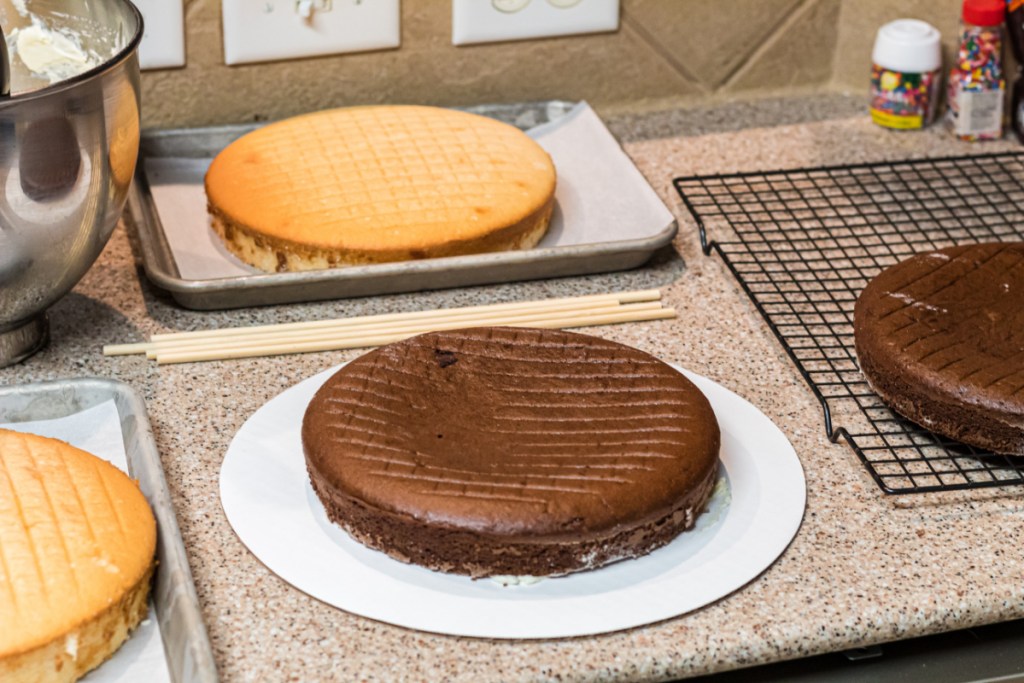
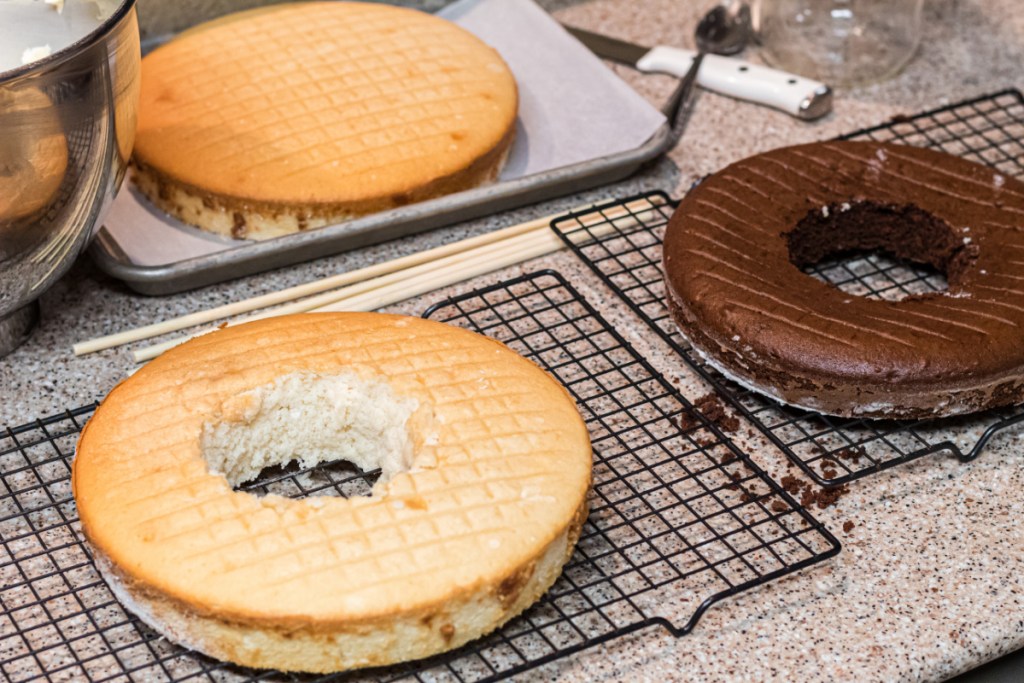
After the cake has completely cooled off, remove cakes from cake pans. Set two layers aside (they will be used for the bottom layer and top layer).
7
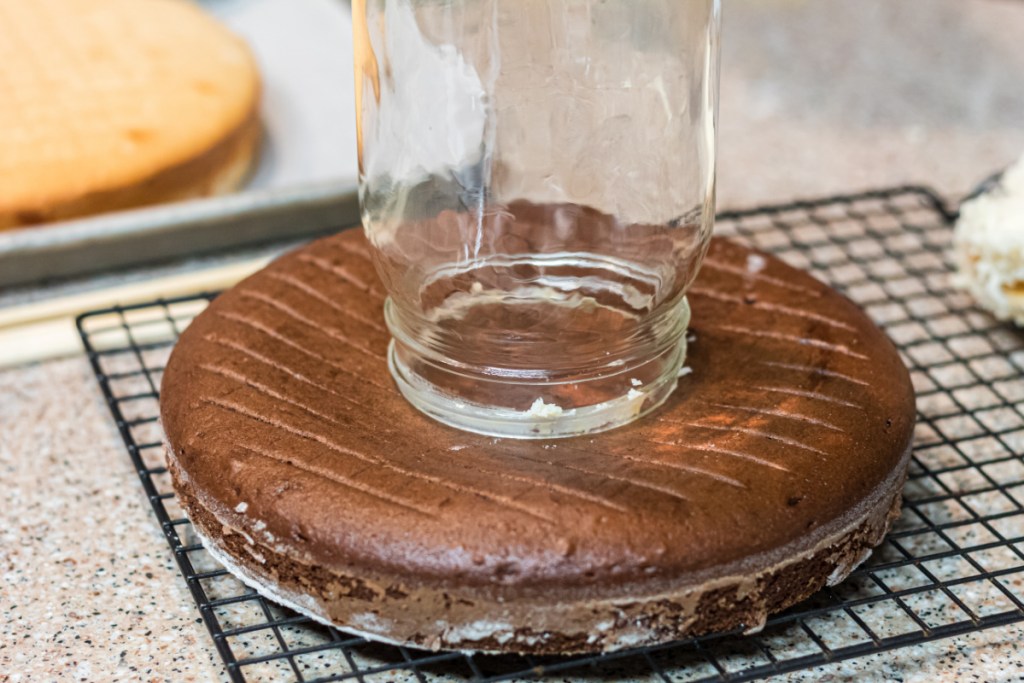
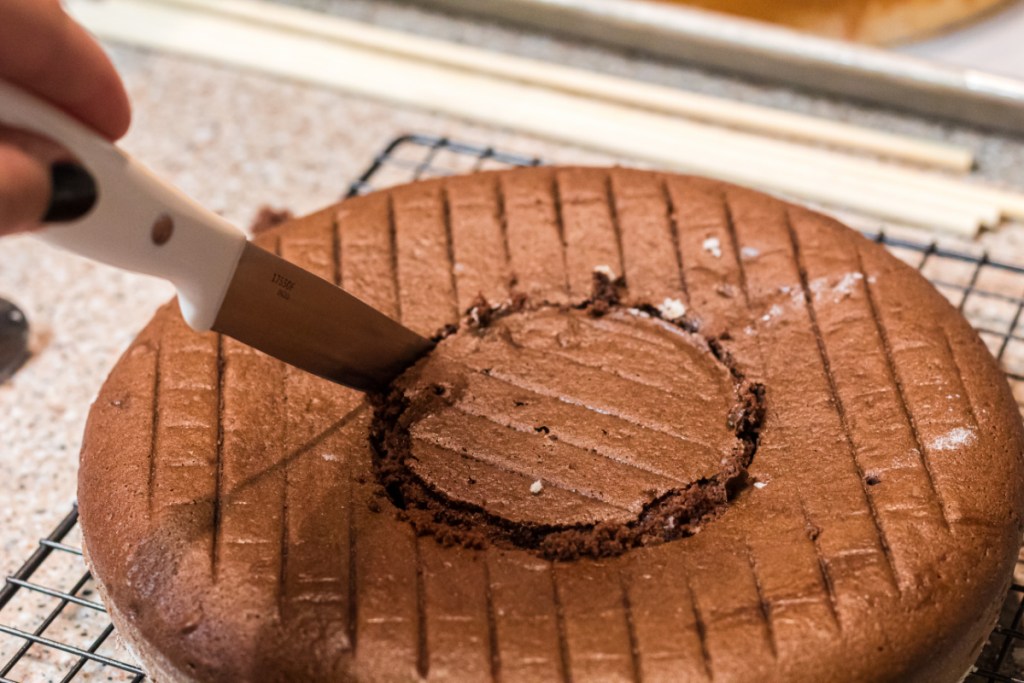
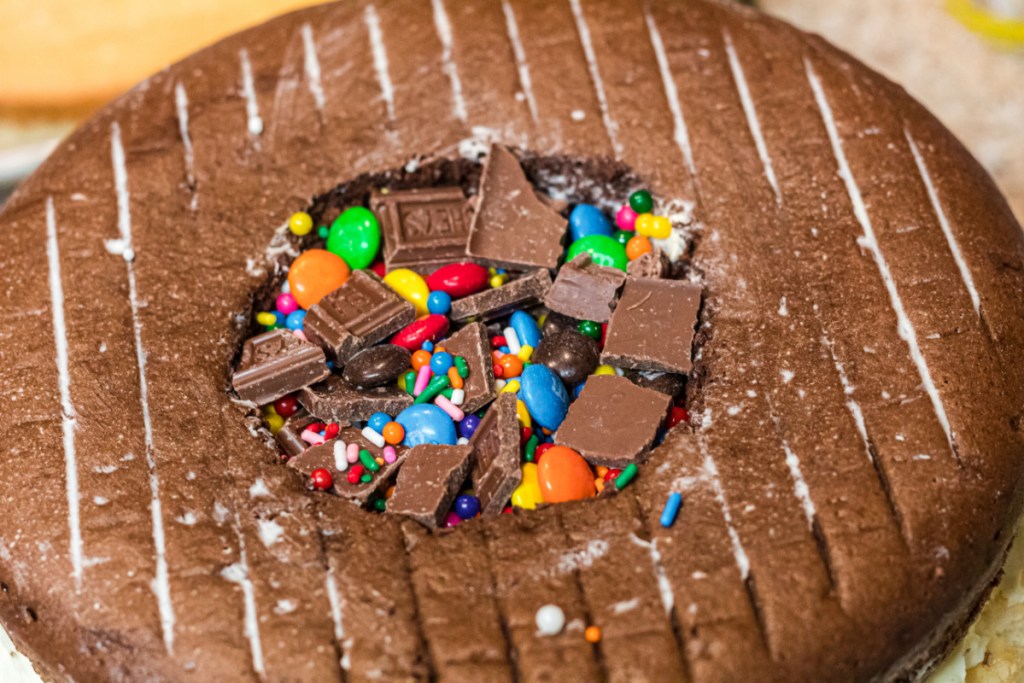
For the middle cake layers, you will need to grab a 3” diameter biscuit cutter or you can use a wide mouth mason jar as I did. Place your 3” cutter in the center of a cake layer and cut around your diameter. Repeat on the second cake layer. Remove the full hole you have created from the center of the cakes.
8
At this point, you should have two 8” round cakes that have a hole in the center and two that do not.
9
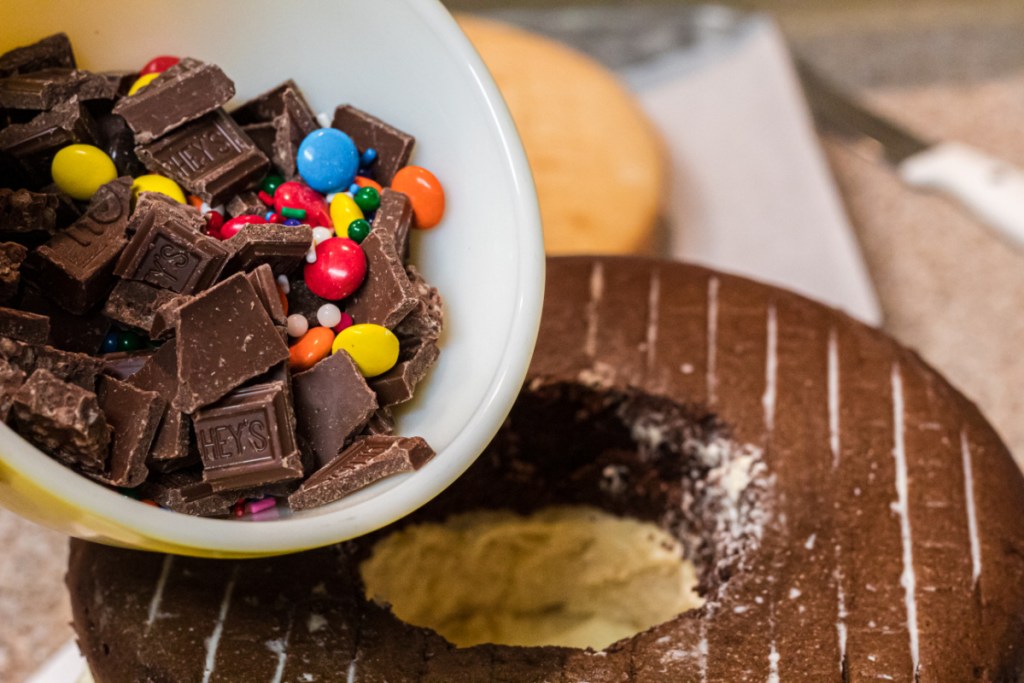
Depending on what kind of candy you picked out, you might need to break the candy into smaller pieces. For example, if you picked a candy bar, I recommend cutting it up into smaller pieces. Mix all your candy and sprinkles into a bowl and set aside.
10
To assemble the cake:
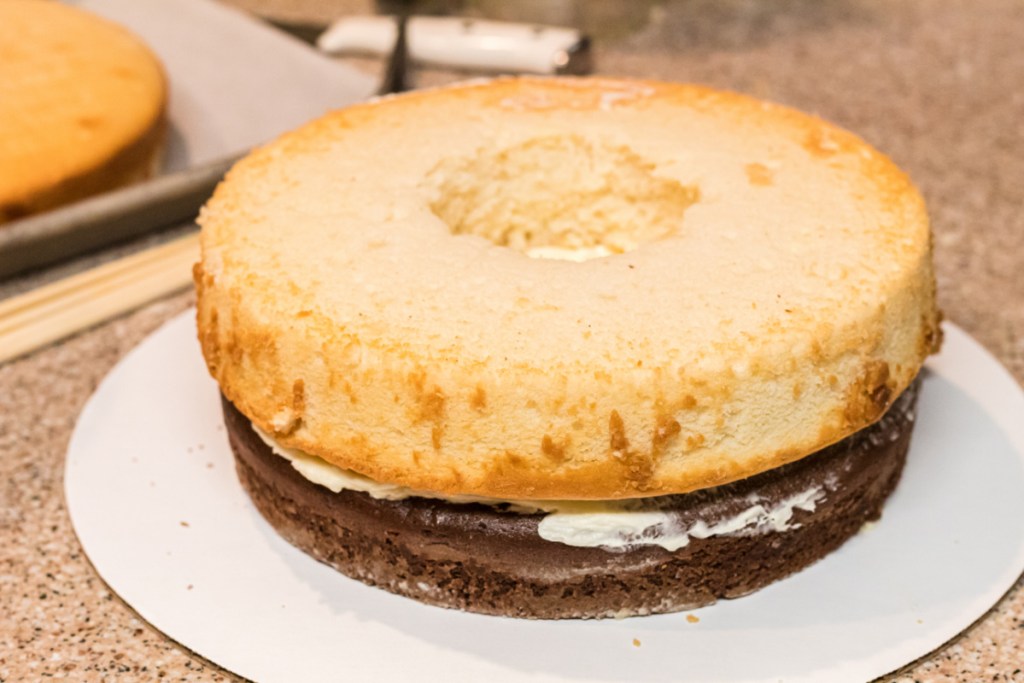
Start with one of the full cakes on the cake plate. Add a thin layer of frosting over the cake. Now grab one of the round cakes that does not have a center and place on top of the bottom layer.
11
Add a thin layer of frosting to the top and repeat with the other cake that does not have a center.
12
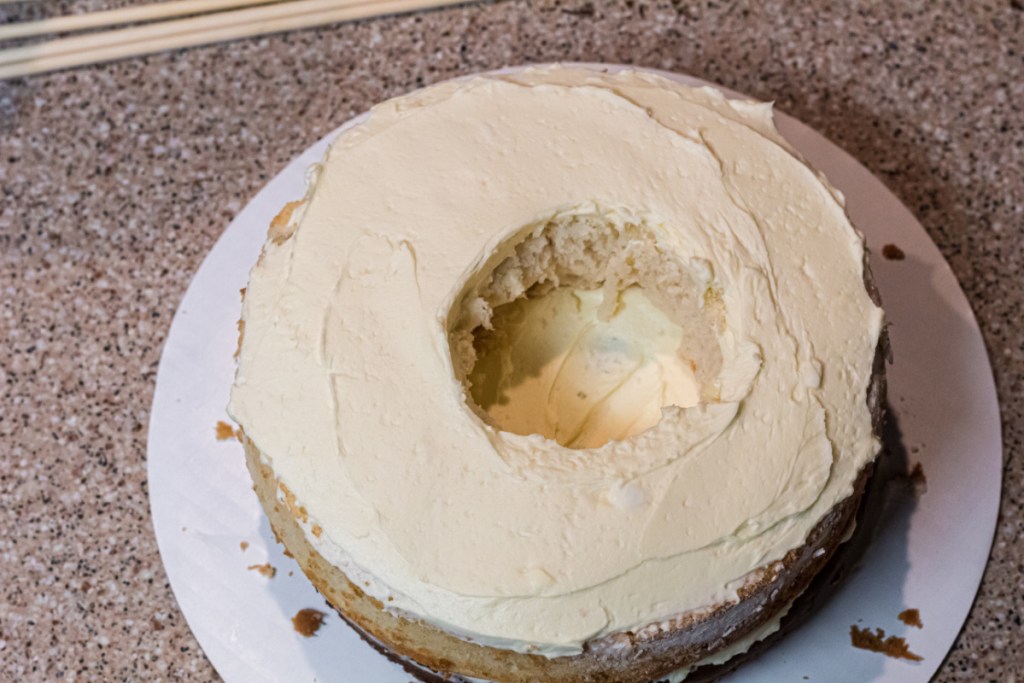
Take all your favorite candy and sprinkles and pour it into the middle of the cake. Softly press down making sure you are adding as much candy as you can and filling the center all the way to the top. Add the final layer of frosting and place the last cake layer on the top.
13
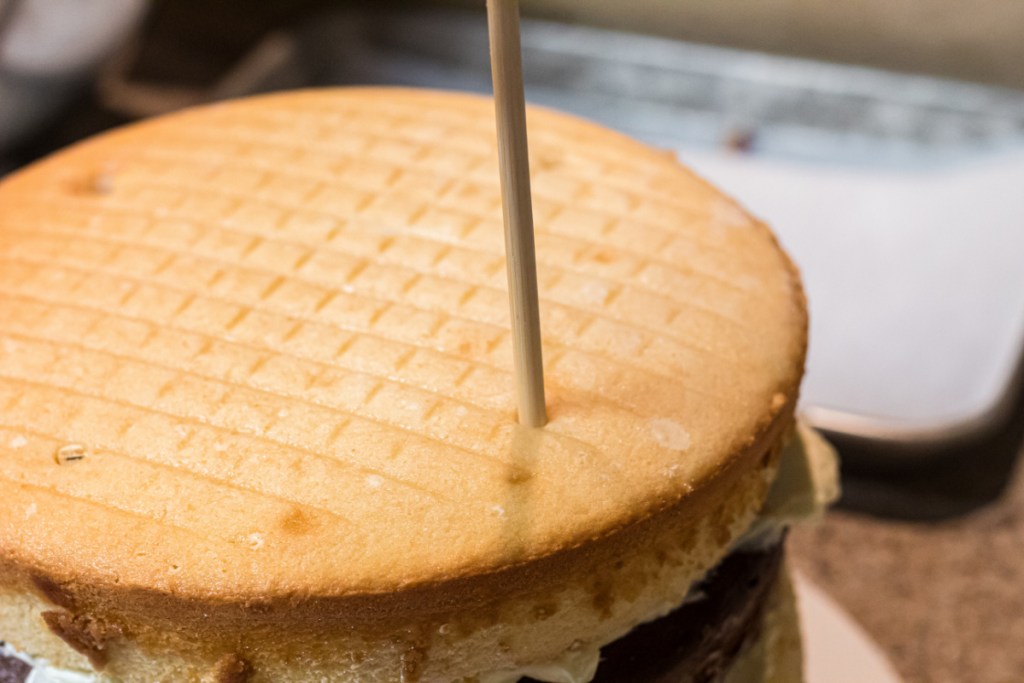
Carefully place the cake dowel rods into the cake straight down at 12-3-6-9 as if the cake was a clock. This gives the cake support since it is a large cake.
14
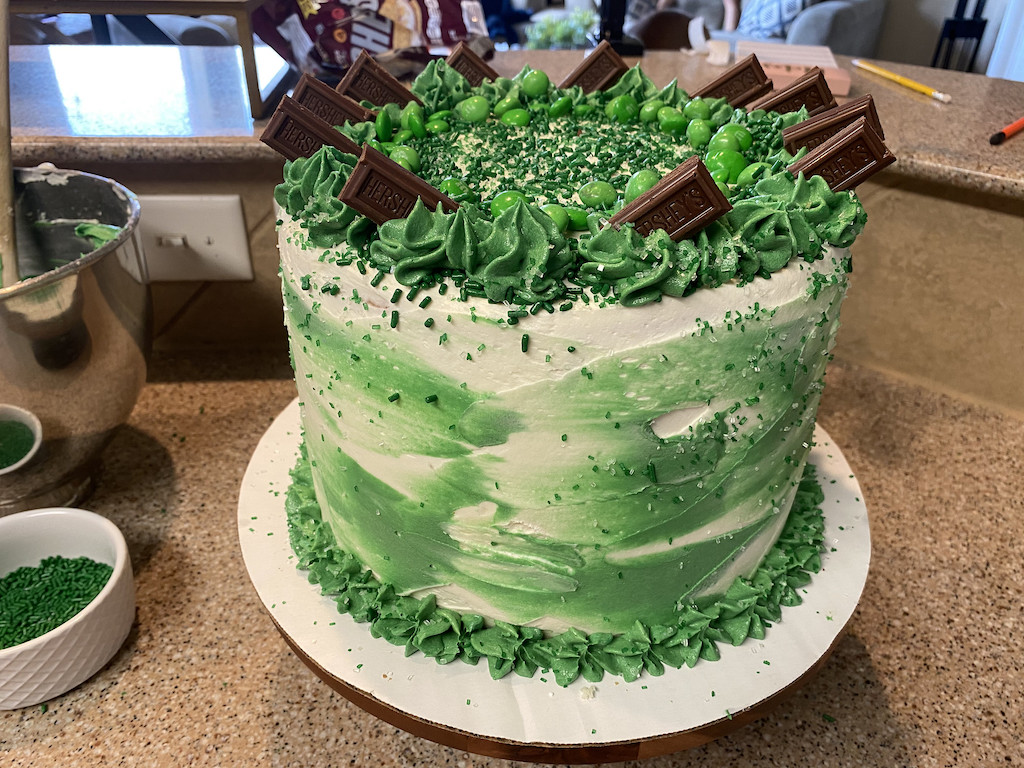
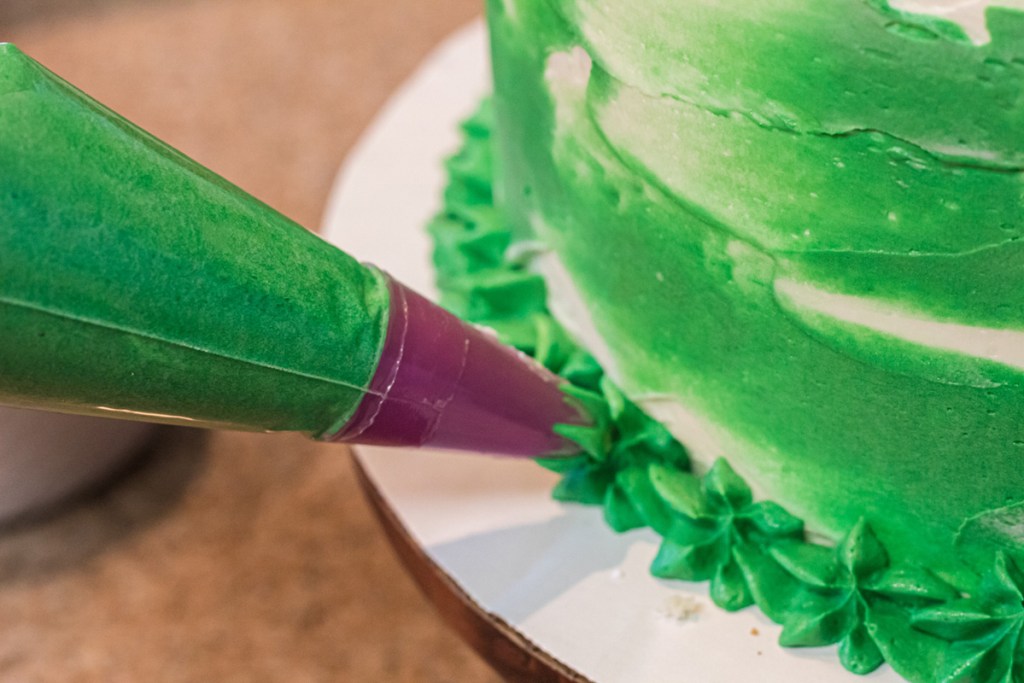
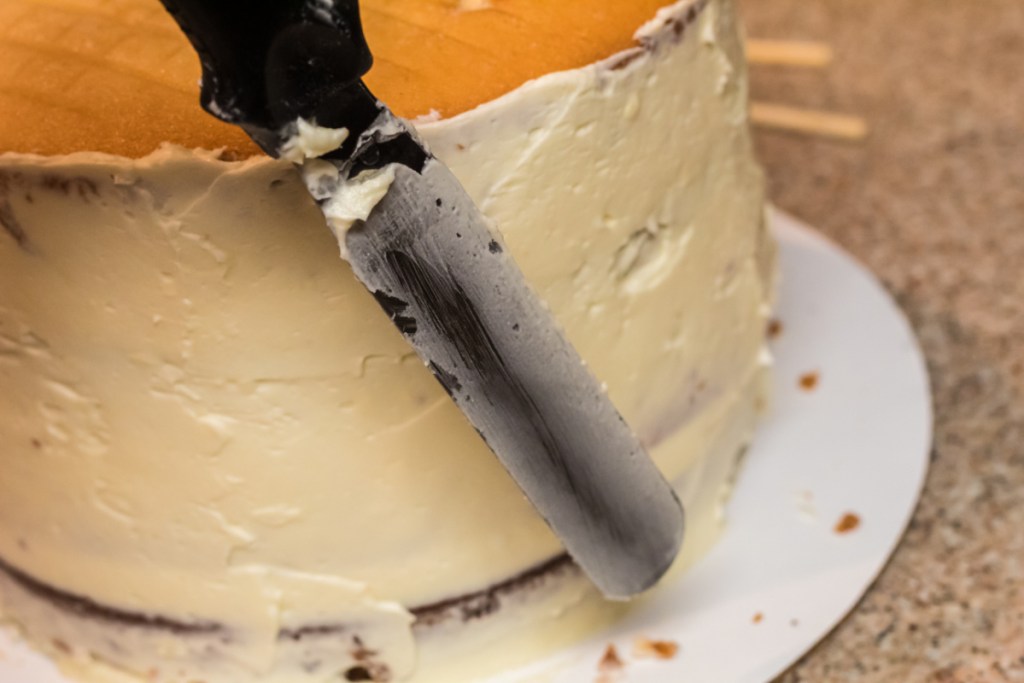
Frost the cake however you'd like with buttercream or store-bought frosting. Top the cake with the remaining frosting and candy.
15
Place the cake in the refrigerator until you are ready to serve.
16
Now it is time to cut the cake! Slowly cut into the cake and watch the kids' eyes light up when they see the surprise. Enjoy!
This piñata cake will be the star of the celebration!
Now you can sit back and listen to all the OOOHHH’s and AAAHHHH’s of your delicious creation. Everyone will be talking about this cake for weeks after the celebration!
Check out what my teammate Melinda had to say about this cake recipe:
“I love this recipe! I’ve made this cake twice this year for both my daughter and son’s birthdays, and it’s such a hit. I am so impressed with how simple it is. The aesthetics make this cake look so professional and technical, but it’s actually super easy; any amateur baker can successfully make this cake. A crowd favorite for sure, especially among kids!”


Thanks for sharing! This would be a great Thanksgiving cake for my kids.. and pie of course. Yum 😋
What a fun idea! You’re very welcome!
I made one for my sister. My advice is to keep the center hole relatively small bc it takes more than you’d expect to fill the center! I used m&ms and it was two bags. But it was super cool!
Great tip! Thanks, Amy!
What a coincidence,last night my daughter asked for the same for her birthday 😀thanks!
Oh perfect! You’re so welcome! Happy Birthday to your daughter! 🥳
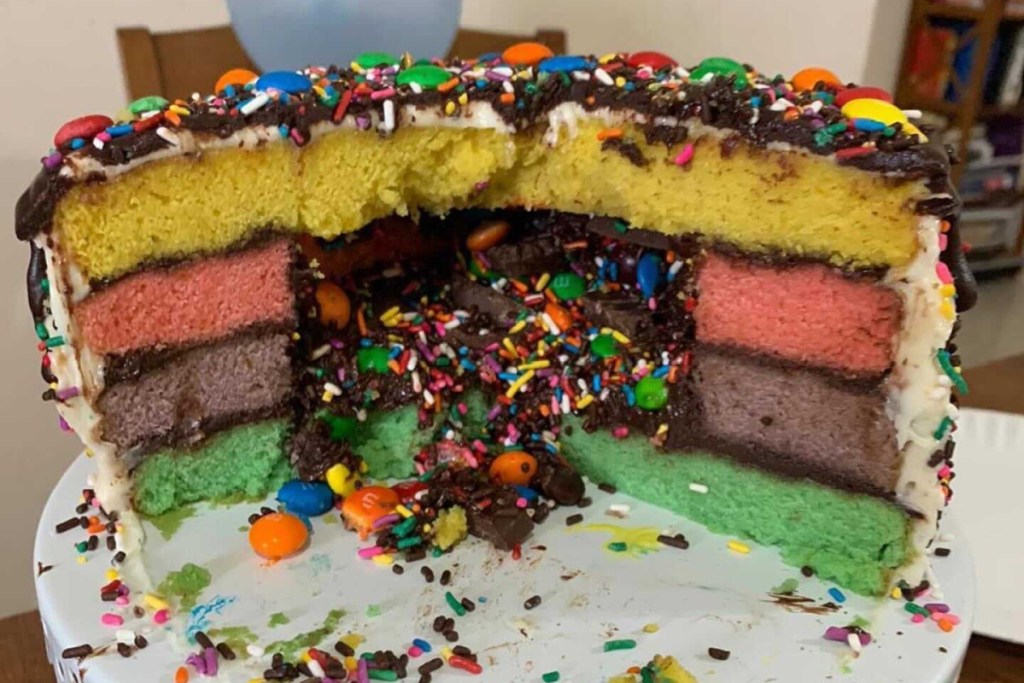
I made a pumpkin out of two Bundt cakes and one round cake. Used candy corns and mallow pumpkins to fill the middle. Turned out super cute.
OOH! I LOVE this idea! I’ll have to give it a try! Thanks for sharing!
What a cute idea!
This looks like so much fun! Thank you so much for posting. I can’t wait to try this! This looks like it would fun to celebrate for New Year’s Day!
Do you leave the skewers sticking out of the frosting to remove them? I just imagine 4 kids finding skewers and running around poking everyone with them.
They are stablizers to keep the cake from falling over so you leave them in. Simply remove when you cut the cake. You can also use thick plastic straws.